10 min to read
Phaser 3: Let's build a simple shooting game #1

Before you read this
All you need to know is basic JavaScript knowledge, HTML and a little bit of Maths.
It will be really hard for those who are not familiar with programming or JavaScript in particular. If you want to understand more about JavaScript, MDN has a very good tutorial and well written documentation.
Additionally, you should know basic trignometry. Although Phaser already handles most of the calculations but knowing sine/cosine will help you understand better, knowing what’s going on under the hood.
![]()
Introduction
There are plenty of libraries and frameworks that let you build your games on browsers. Phaser is one of them.
Phaser is a JavaScript game framework that let you build modern 2D games. There are two major version of Phaser, Phaser 2/CE and Phaser 3. Phaser 2 and 3 are completely different, even if you already have a fundamental knowledge of Phaser 2, you still have to learn everything from the start with Phaser 3. At the time I wrote this post, I was new to Phaser, the fact that I only spent 2 days reading its documentation.
I’m going to use Phaser 3 for now. Phaser 3 offers more feature than Phaser 2, don’t expect much from Phaser 2, mostly just bug fixes and small update changes. The only reason why you should use Phaser 2 instead is because it is well covered with docs, tutorials and examples. Phaser 3 is indeed harder to learn and that’s why I think it’s worth to write some posts about it.
Set up
You will definitely need a browser, a web server and a text editor (not notepad). You have to use a web server in order to run your game. In the docs, Phaser already explained why you need a web server.
About text editor, you can use any editor you like (Again not notepad). If you don’t know which one to choose, I suggest you to use Sublime Text or VSCode. VSCode has an extension that allows you to run web server which is pretty handy.
What are we missing?? Yes, the Phaser framework. There are two ways you can download Phaser, either via npm or cdn. Phaser has a well written download tutorial if you want to take a look at.
And also you should take a look at Phaser tutorial to get an idea of its struture.
Part 1
Sprites and game loop
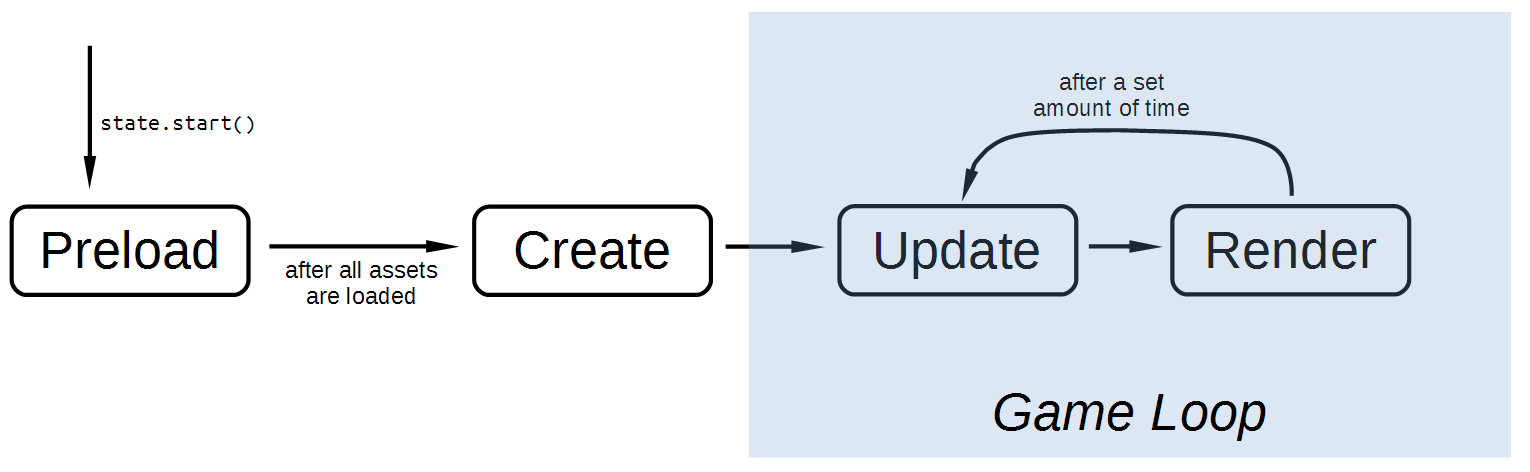
Here is the overview of how Phaser works
-
Preload - The game begins with preload function to load all assets. Without this function, the game will just be stuck in the middle because it has nothing to load.
-
Create - This is where we set up the game. It is only run once to create the game
-
Update - This is our main function. What happens in your game are done here. This is also where you will spend most of your time in. Some examples are checking collision, scoring, moving objects, etc.
-
Render - This is where the game renders stuff. But usually you don’t have to touch this. You can use update function because Phaser automatically renders everything.
Preload
We will definitely need sprites, sprites are game objects, they are something that we can see it visually. In Phaser, before you can use any assets/images, you must load them in preload function. Why? Because if you have a bunch of assets (sounds/images/plugins etc.), it will take time for all of them to be loaded in game. And the preload() function will make a huge different. You don’t really have to worry about how the function works under the hood, once you declare it, it will be automatically run by Phaser.
You need to have a background image, it can be whatever you like and a bullet image (obviously).
preload() {
    this.load.image('space', 'assets/space.png');
    this.load.image('bullet', 'assets/bullet.png');
}
Just in case, the following syntax are for all intents and purposes the same.
preload(){

}
preload: function(){

}
Let’s talk about what is going on here. The load.image() function loads an image with a given path (in our case: assets/space.png ) and gives it a name (ie. space). Why it needs a name? Because we will use it later. You can think it as a variable that holds the image for us.
Create
Now we need to display the images that we just loaded from preload function. In Phaser, this needs to be put in create() function. This is also part of Phaser’s functions that handle this for us.
create(){
    this.space = this.add.image(600, 300, 'space');
    this.bullet = this.add.sprite(400, 300, 'bullet');
    // add more sprite here if you want
}
The function add.sprite() takes 3 parameters, the x and y coordinates of the sprite and the given image name that we previously declared in preload() function.
Screen coordinates
You probably learn about the cartesian plane where you need to define a value pair (x, y) in order to plot a point. The centre point is at (0,0) and the value x increases as you go further to the right and value y increases as you go up.

Sadly, computers don’t use cartesian plane. Instead the point (0, 0) being placed on the center, it represents at the top-left at the screen. And instead of decreasing, the y value increases as you down. The x stays the same.
Size of sprite
I know lots of people might experience this issue. Sometimes, the image is too big or it might be too small. There are some functions that let you resize the image/sprite to fit your game style.
this.bullet.setScale(valueX, valueY)
this.bullet.scale = valueForBothXAndY
this.bullet.scaleX = valueX
this.bullet.scaleY = valueY
These above function do the same jobs. Usually, the scale value is below 1 if you want the image to be small. 1 is default value. If you want the image to be large, use a higher number. Usually you will want to set both scaleX and scaleY to the same value otherwise, one side will look big than the other.

Okay but we will have another big problem. Even the image is scaled, the hitbox of the bullet remains the same (The pink squared box is the hitbox of the bullet). It does not change regarless of the scale function. What can we do?
this.bullet.setSize(size, size)
The setSize() function accepts 2 parameters , width and height. This function does not change the display of the image but rather the internal size of the image which is used for physical stuff such as collision. In other words, we want to use this function to make the hitbox fit our scaled image.

Now we can see that the pink squared is inside our bullet image. Indeed you can make it larger to wrap around the bullet.
Move the bullet
Now, hope you get the idea of how Phaser works behind the scenes. To move our bullet vertically, we can just simply reduce its y-coordinates in the update function
update(){
    this.bullet.y -= 200;
}
Physics
Phaser comes with Arcade physics system that handles most of the calculations for us.
Velocity
After adding the bullet sprite, we can simply set its velocity and Phaser will handle the rest of the calculations for us.
create(){
    this.bullet = this.physics.add.sprite(400, 300, 'bullet');
    this.bullet.body.velocity.y -= 200;
}
update(){
}
We need to enable physics so our sprite can understand what velocity is. Simply just change the function to physics.add.sprite() instead of add.sprite(). Then we will need to change its y-velocity, how fast it moves vertically this.bullet.body.velocity.y -= 200, in other words, the bullet will move 200 pixels per second upward.
Collision
In our update() function, we need to tell the computer to know when the bullet collides with the enemy. Luckily, Phaser comes with a very handy function. This
update() {
    this.physics.overlap(this.bullet, this.enemy, this.hitEnemy, null, this);
}
The overlap function needs a callback function to be called when the objects overlap. Which means, you can add a function to do something upon collision. Here’s an example:
hitEnemy() {
    this.enemy.destroy()
    this.bullet.destroy()
}
Phaser provides us with a destroy() function to kill the sprite. Which means, after calling the function, the sprite will be marked as dead and invisible
Debugging
If you want to see object’s hitbox, or the direction the object is moving, in your game configuration, under physics property, add the following line of code to enable debug mode.
const config = {
    type: Phaser.AUTO,
    parent: 'phaser-example',
    width: 1280,
    height: 700,
    physics: {
      default: 'arcade',
      // Code starts here
      arcade: {
        debug: true,
        }
    },

  }
If you’re done with testing, you should disable debug mode.
Sometimes, you need to cheat or copy the code. The code I provided to you are just for preferences, If I put the full code here, I know lots of people will just blindly copy and paste them but what I show here is something that you will need in order to build a simple game


Comments